Beginner’s Guide: How to Start Seeds Indoors
Learning how to start seeds indoors is a skill worth developing. Growing crops from seeds is a cost-effective way to expand your garden. Starting seeds indoors offers more variety than store-bought transplants and allows you to grow plants at the perfect time for your climate. Here’s a simple guide to help you get started, covering everything from setup to transplanting.

Key Takeaways
- Starting seeds indoors is cost-effective and allows for more variety.
- Follow these 10 steps for success: choose the right location, gather supplies, set up your space, and prepare soil.
- Plant seeds according to packet instructions and care for seedlings by monitoring light and moisture levels.
- Thin seedlings to leave the strongest plant and begin fertilizing once true leaves appear.
- Harden off seedlings before transplanting outdoors to avoid shock and ensure healthy growth.
Article Outline:
- 1. Choose the Right Location
- 2. Gather Your Supplies
- 3. Set Up Your Indoor Seed Starting Space
- 4. Prepare the Soil
- 5. Plant Your Seeds
- 6. Care for Growing Seedlings
- 7. Water Wisely
- 8. Thin and Fertilize Indoor Grown Seedlings
- 9. Transplant to Larger Containers
- 10. Harden Off Indoor Grown Seedlings Before Planting Outdoors

How to Start Seeds Indoors: 10 Steps for Success
1. Choose the Right Location
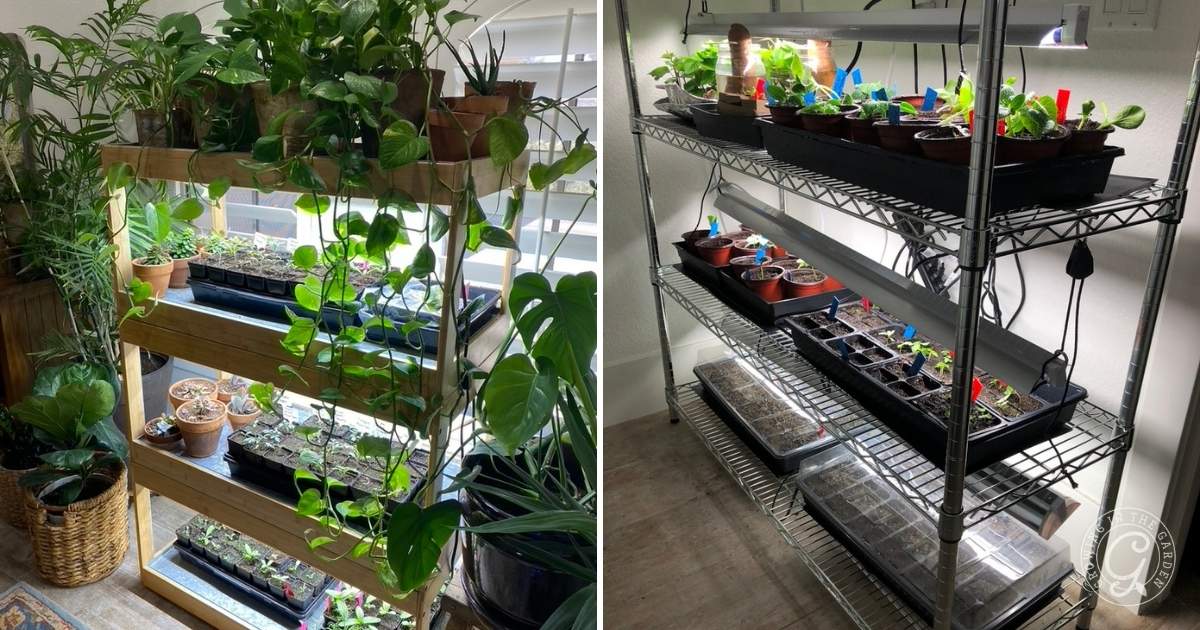
The ideal temperature for starting seeds is between 70-80°F. If outside or in your garage isn’t the right temperature, you can get creative and find a spot in your home that is. I use a wire shelving unit that I move into my office or laundry room when it’s time to start seeds indoors. It holds my seed-starting supplies in the garage for the rest of the year.
Use this seed germination temperature guide to double-check the correct temperature for the seeds you’re starting.
Starting a garden can feel overwhelming. Read this guide to help you avoid new gardeners’ most common mistakes.
Gardening comes with its own language, and it can get confusing. That’s why I created the Practical Gardening Glossary—a handy A–Z guide that explains terms like “hardening off,” “vermiculite,” and “germination” in plain English. It’s a great tool whether you’re just getting started or brushing up on your garden vocabulary.
2. Gather Your Supplies
It might seem like a lot, but you don’t need everything. Even a single seedling tray with a grow light on your counter is a great start. See a list of my favorite seed starting supplies here.
Essential Supplies for Starting Seeds Indoors:
- Seeds: For trusted varieties that grow well season after season, visit my favorite seeds.
- Seedling Pots and Tray: Use what you have on hand. I love these trays from Burpee and these from Bootstrap Farmer.
- Seed Starting Mix: Use a sterile, bagged mix — avoid regular potting soil. I like this one.
- Light Source: LED lights work well. Choose one that fits your space and budget. The light from a window is insufficient to grow vigorous, healthy seedlings indoors. See one I like here.
Nice-To-Have Indoor Seed Starting Supplies:
- Humidity Domes: Good-quality domes will last for many seasons. You can also cover seedlings with plastic wrap or burlap to retain moisture.
- Vermiculite: It allows light to penetrate the surface of sown seeds while keeping the soil hydrated. It also helps prevent algae from forming and can help prevent fungus gnats.
- Heat Mat: Keeps the soil at the optimal temperature of 70-80°F for germination.
- Labels: These should be small enough to fit inside the humidity dome. Get creative and use what you have on hand. Wood labels may bleed. These labels give you plenty of room to write. .
- Fan: This is the one I use. It ensures air circulation, which helps seedlings grow strong and prevents disease.
- Power Strip and Timer: Use one with a timer for your lights and another for the heat mats and fans.
- Watering Can: A long spout makes indoor watering easier.
- Wire Shelving: Ensure the dimensions fit your trays and lights.
Good tools and reliable products save time and reduce frustration in the garden. Visit my favorite garden supplies page to see the ones I recommend for every stage of gardening.
3. Set Up Your Indoor Seed Starting Space
Before planting, make sure your indoor growing area is ready to go. Set up your lights, plug in the heat mat, and ensure everything fits and works properly. Clean and sanitize your seed pots and trays. Organize your seeds, plan how many to plant, and make your labels before getting your hands dirty.
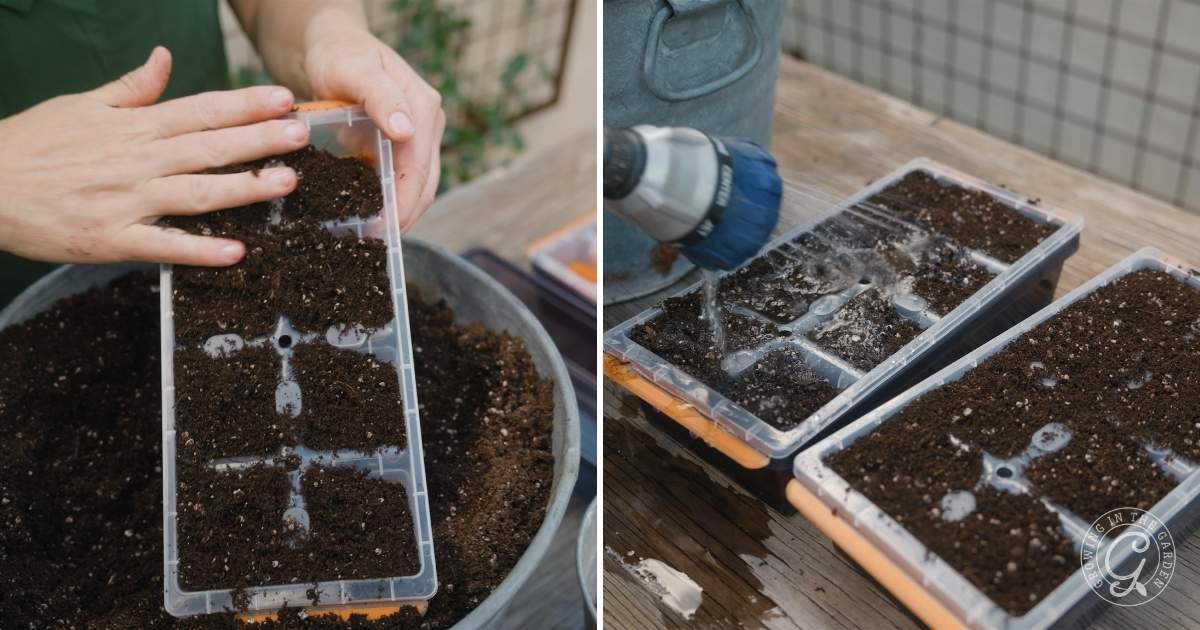
4. Prepare the Soil
Moisten your seed-starting mix until it’s damp but not soaking wet. Fill your containers, making sure there are no large air pockets. This step ensures that the seeds will have the right environment for germination.
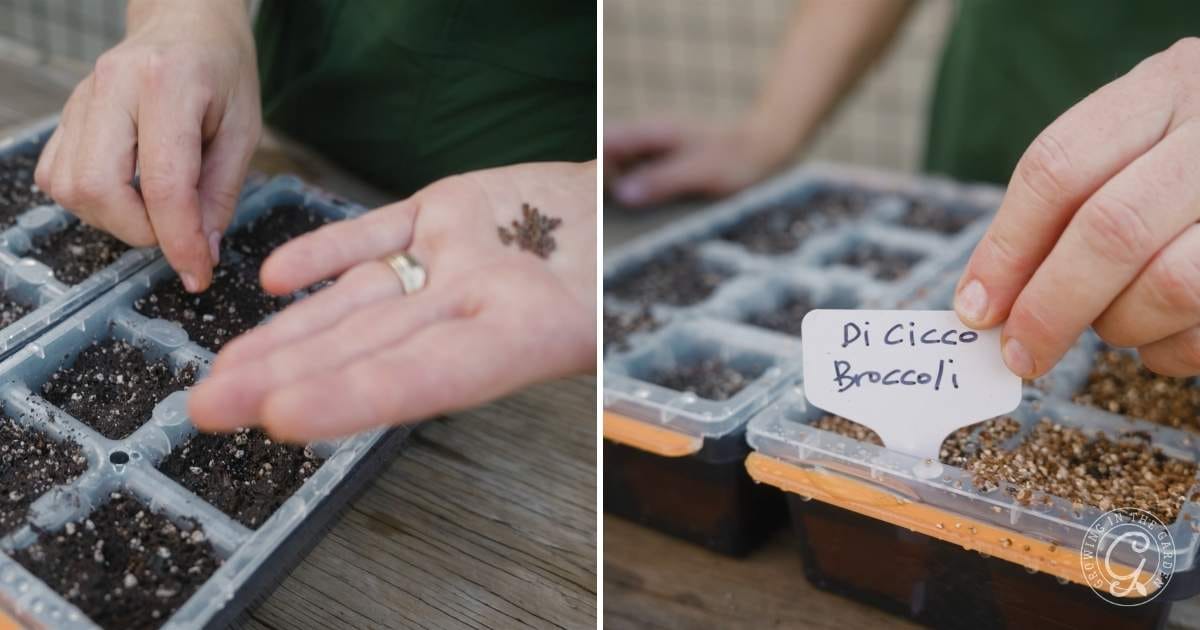
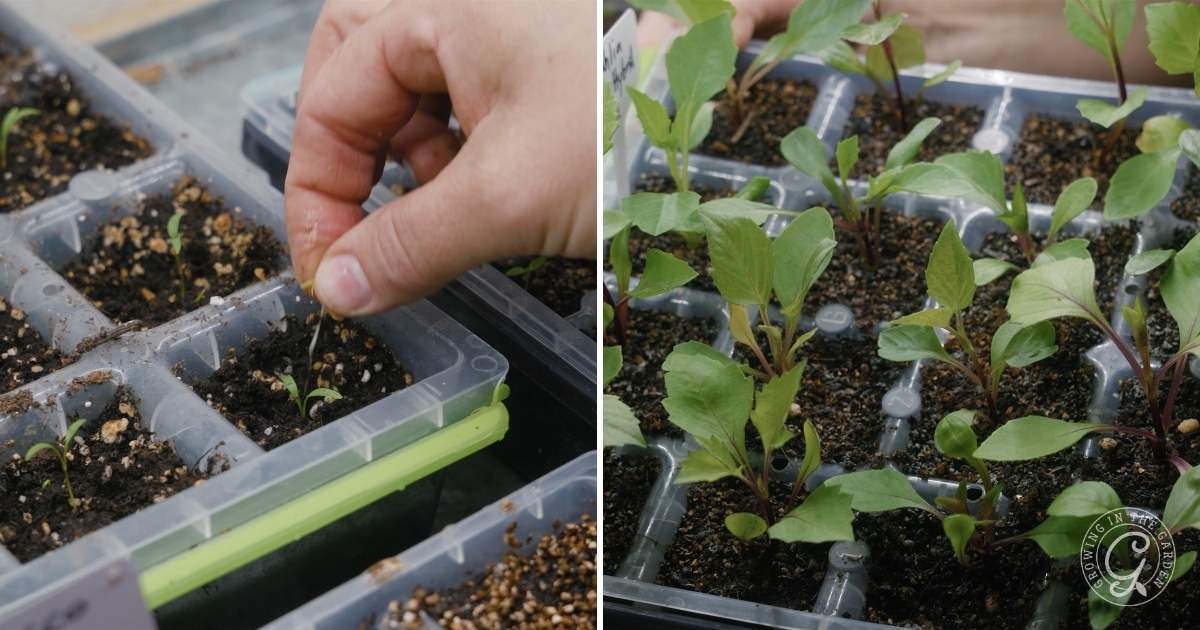
5. Plant Your Seeds
Follow the directions on the seed packets for planting depth and spacing. Plant 2-3 seeds per pot to increase the chances of successful germination. Press the seeds gently into the soil to ensure good contact. Sprinkle with vermiculite (if using). Add labels as you go, cover the trays, and place them under lights on the heat mats. Use a timer to keep the lights on for 12-16 hours a day.
Aim to plant seeds with similar germination times in each tray. This will make it easier to remove the humidity dome or seed cover when it’s time.
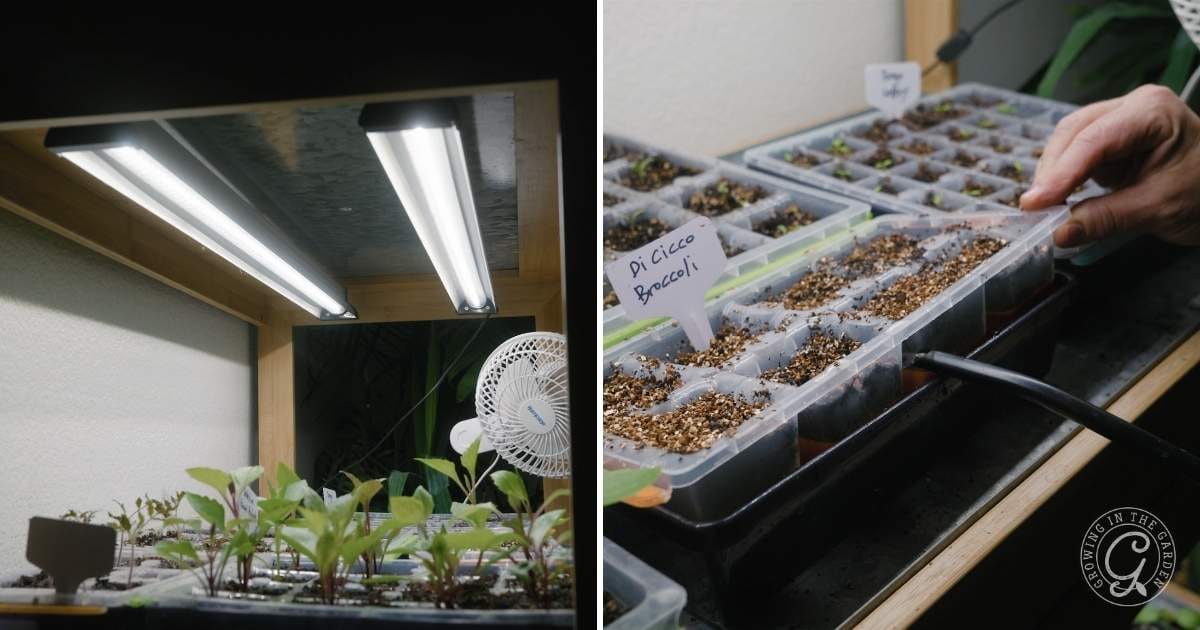
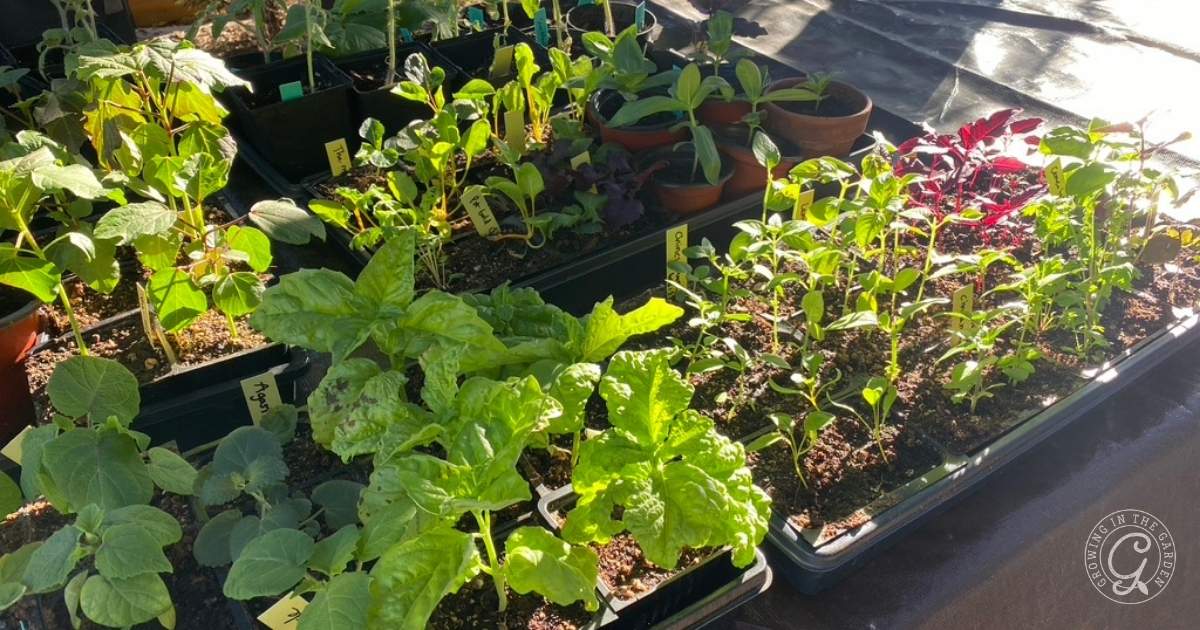
6. Care for Growing Seedlings
Remove the cover or humidity dome once a few more than half of the seedlings have sprouted.
Keep the lights on for 12-16 hours a day. Keep the light within an inch or two of the seedlings to prevent them from becoming leggy. Some LED lights may be kept further away; follow the instructions that came with your lights. If the seedlings looked scorched, move them further away. If the seedlings are leggy or elongated, put the lights closer.
Use a fan to provide airflow, which helps strengthen the plants and prevent disease.
7. Water Wisely
Keep an eye on your seedlings’ moisture levels. Water from below using a watering can, ensuring not to let the seedlings dry out or become waterlogged. This also helps prevent fungus gnats.
If water remains in the tray a few hours after watering, remove it with a syringe or carefully dump it. (I like to pour it into my houseplant pots.)
8. Thin and Fertilize Indoor Grown Seedlings
When seedlings develop true leaves, thin them to leave the strongest plant in each pot. The earlier. you thin to one plant per cell, the quicker they will grow. You can gently tease up the extra seedlings with a pencil and replant them in other pots if desired.
Once true leaves appear, it is also time to start fertilizing. Begin by adding a half-dose of seaweed fertilizer to your water. One week later, feed with 1/2 dose of fish fertilizer every other time you water.
9. Transplant to Larger Containers
Knowing exactly when to start seeds indoors can be tricky sometimes. If your timing is off and your seedlings outgrow their containers or roots start coming through the drainage holes, you need to pot them up into larger containers. This step may not always be necessary, depending on the size of your seedlings and their original containers. Learn more about potting up in this blog post.
10. Harden Off Indoor Grown Seedlings Before Planting Outdoors
Once the seedlings have several sets of true leaves and the outdoor soil is at the correct temperature, you can plant them outdoors. Hardening your seedlings off before moving them outside is crucial to avoid transplant shock. About a week before transplanting, start by turning off the heat mats during the day and keep them on only at night. Gradually expose your seedlings to outdoor conditions by placing them in a shady, protected spot for an hour or two each day, increasing the time and sun exposure daily. Learn more about the process of hardening off in this blog post.
For spring planting, transplant in the morning so plants can adjust before nightfall. For fall or monsoon planting, transplant in the early evening so plants can adapt to cooler night temperatures.
With these steps, you’ll be well on your way to successfully starting seeds indoors and growing healthy, vigorous plants ready for the garden.


Hello, thanks for another great article. How far back do you let the soil dry back once you have seedlings? Or should the soil stay fairly moist all the time? I don’t seem to get very good root development to the bottom of my trays.
I don’t let them dry back very far. I do tend to keep them fairly moist.
Hi Angela
Can never thank you enough for all you do…..Sharing all of your knowledge …. You are more than Amazing
It’s my first time starting seeds inside. I’ve been doing seeds outside in Scottsdale for 20+ years
I bought everything needed from the links you shared and I’m ready to go I’m so excited
You mentioned to put the grow lights 2 inches from the seedlings. Is that correct ? So How close do I put the lights when just starting with the seeds ?
Also it’s not too late to start everything on your August calendar now then put the transplants from seed in at end of October?
Can’t wait to meet you and thank you in person. See you soon
Lolo
Hi Lolo – keep the lights a couple of inches away from your pots – monitor the plants – they will tell you how close the lights need to be. If they are getting leggy, move them closer, if they are getting scorched move them further away. If you’re asking about starting August seeds indoors, you should be fine to start them now. Best of luck to you!
Hi! My tomato seedlings are ready to be fertilized. Unfortunately, I don’t have the two you recommended in the article at hand (kelp and fish). I *do* happen to have liquid ArgoThrive Fruit and Flower on hand…will this work, or should I wait the week it will take to get the kelp and fish ones? Thanks, again! – Jilly of Scottsdale
Use a light dose of the liquid fruit and flower one.
Hi Angela. I’m back… I’m using the same trays you recommend and a similar-sized fan. However, it looks like there is mold or something affecting my celebrity tomato seedlings. The pepper and black krim are just fine. The dome came off when half of the seedlings emerged.
Any treatment thoughts?
It’s usually not harmful, but you can sprinkle a small layer of vermiculite on top of the soil and that helps with this.
Hi Angela. Our seedlings have popped – very cool as this is the first time we’ve done this.
Question: how long do you leave the fan on? All day or a portion or …?
Yay! Congrats! You can leave them on all the time. I usually leave them for the hours the lights are on and keep them on the same timer.
good morning Angela. I have several of your perpetual calendars that are like daily bibles to me. Love them. My question is this, when you list what to grow in each month, do you mean to actually plant seeds in the garden that month or transplants? I have been starting seeds indoors to plant in the garden on the month you stipulate, but wonder if I can put seeds in the ground on the months that you stipulate? Thank you!
The dates listed are for planting outside. The newest version of the calendar also lists the seed starting dates for seed starting dates indoors.
Your videos and directions are the BEST Angela! Thank you so much for taking the time to explain everything in such detail. I’ve got everything ready to go and am just waiting for the seeds I ordered to be delivered this week! Excited to start this!
I really appreciate the time and effort you put into details and explaining the steps. I feel like this should be so logical but I have had such a hard time with success on starting plants. Thank you so much! You’re awesome!
You’re welcome!
Hi! Thanks for creating this site! It is nice to read something that is clear and very well written and well thought out. You really know how to present a great deal of information in a short amount of time. Kudos!
I am very grateful that you have stream-lined the process about starting seeds. I read the back of seed packs and don’t get a lot out of it. Always more questions then answers….
I just ordered seeds today and have been wondering about the heating mat now I will make sure all of my starts don’t have cold feet. I am putting all of your tips into play as I attempt to grow a garden.
I just found you on Utube this evening so I really appreciate the information about container gardening as well. The information about the correct pot size is something I have struggled with so again Thank You for sharing excellent info for correct plant size. My yard is very shady except for a very few places so for the most part I will be container gardening.
I am fairly new at this – my second real year -but really enjoy seeing the little plants grow. I live in NE TX so I do experience the extremes that Mother Nature throws at me here. Very hot in the summer and some winters very cold. ( this year so far is an exception. )
Thanks again for creating a site that covers real information on different aspects of gardening that is about gardening.
Happy Gardening ~ M
Thank you so much for your kind words and encouragement. Best of luck to you with your garden this season!
Thank you for the detail info! What do you think of soil blocks? I have trouble getting the seedling off the little plastic cells. Wondering what are the advantages and disadvantages of soil blocks?
I’ve great things about soil blocks for starting seeds. The disadvantage could be it may be messier. I need to give it a try!
Hi. The grow get you have linked on Amazon is not the ones in your picture of your shelving unit. I’m looking for 4’ long ones but the Amazon link is to a 2’ wide light. That won’t fit on the 18” shelf. Have you tried an LED instead of the T5? Thanks in advance for your help
Hi Margaret, The ones I have are these: https://amzn.to/3t5Ch6n and in the description they say they are about 13 inches and I just measured mine to be sure, they are about 13 inches wide. I’ll check the links again and update them. I haven’t used LED yet because I have these and don’t want to pay to upgrade them.
Hi Angela! What plants do you start indoors in the summer vs spring? For July, do we start indoors things that would normally be planted in August or September (according to your helpful lists)?
Here is a blog post that may be helpful: https://growinginthegarden.com/when-to-start-seeds-indoors-a-seed-starting-guide-for-low-desert-vegetables/ It lists when you would start seeds indoors to be ready to plant outside.
Thanks to your post, I have a shelf full of happy seedlings! In anticipation of hardening them off for a monsoon planting, can you provide a little more detail about how it differs from hardening off for a spring planting? For example, soil temps will be much warmer, so should I keep them on the heat mat? It’s hard to find advice online about monsoon planting, so any tips would be appreciated!!
The tricky part with the new seedlings in the monsoon planting is the sunlight. To minimize this I would gradually expose them to morning sunlight and then provide shade if possible for the first week or two. Plant them in the evening so they have the night to settle in. As far as the heat mat, it can speed germination but usually indoor temps in the summer are adequate for growing seedlings indoors.
Thank you for this!!! I have been searching for a thorough step-by-step guide to starting seeds indoors. I tried starting my seedlings a couple of weeks ago with no heat mat and no light source. My seeds germinated, but were SUPER “leggy.” I had to start over.
After reading this, I feel more confident this time.
Wonderful. Best of luck to you.
Thanks Angela. I took notes from your article and for the first time I feel like it might work. Normally I purchase plants but I’ve been wanting to start my garden this way.
Best of luck to you. It can be tricky for sure, but a skill worth developing!
Thanks for the great detailed article and thanks for the links. Its good to be able to get what I need easily and help you out a tiny bit in return.
Tom
Thanks Tom. I am glad the information is helpful. Thanks for buying through the links, I appreciate it. Helps me to continue doing what I’m doing.
Angela, thank you so much. this is really detailed and i appreciate all of your efforts to put this together and help us get our seeds off to a good start!
Thank you Jackie. I appreciate the feedback. Best of luck as you start your seeds!