Seed Storage: The Best Way to Store and Organize Seeds
If you’re a gardener, you know how quickly seeds can pile up—whether you’ve bought them, saved them, or swapped them with friends. Without a good system, it’s easy to lose track of what you have, buy duplicates, or forget about seeds you meant to use. Over the years, I’ve developed a simple and effective seed storage and organization method that works for me, and I’m excited to share it with you.
In this post, I’ll walk you through the essentials: how to store seeds so they last, how to organize seeds for easy access, and tips for keeping your seed collection manageable season after season. Whether you’re a beginner or an experienced gardener, this guide will help you make the most of your seeds and save time, money, and effort.

Article Outline
- Provide Optimal Conditions for Seed Storage
- Understand Seed Life Expectancy
- Find a seed storage & organization method that works for you
- Label Seeds for Easy Identification and Planting
- Create a System for Using and Rotating Your Seeds Each Season
5 Tips for Seed Storage and Seed Organization
1. Provide Optimal Conditions for Seed Storage
To maximize seed longevity, you must protect seeds from moisture, warmth, air, light, and pests.
- Moisture: Seeds must be completely dry before storage. Moisture encourages mold and reduces viability. Avoid humid areas, and ensure seeds feel dry to the touch before storing.
- Temperature: Keep seeds cool and at a constant temperature, ideally between 32°F–50°F (0°C–10°C). Avoid temperature fluctuations—indoors is better than frequent trips in and out of a fridge. Avoid warm areas like attics or garages in summer.
- Air: Minimize air exposure. Store seeds in tightly sealed containers to slow deterioration.
- Light: Store seeds in a dark location, such as a closet, drawer, or under a bed, to extend their lifespan.
- Pests: Protect seeds from rodents and insects. Use secure containers, as cardboard, wooden boxes, and plastic bags are insufficient.

How to Store Seeds For Long-Term Seed Storage: If you want to store seeds for several years, take additional steps to ensure their longevity. Use airtight containers with desiccant packs to absorb moisture or vacuum-seal seeds to reduce air exposure further.
Store seeds in the freezer for maximum preservation—but only if they are completely dry. Allow frozen seeds to reach room temperature before opening the container to prevent condensation, which can damage the seeds.
By controlling these factors, you will create the ideal environment for long-term seed storage and keep your seeds viable for future planting.
2. Understand Seed Life Expectancy
How long can you expect stored seeds to last?
- Seed viability depends on their maturity and storage conditions. Fully ripened seeds last longer in storage and germinate better than underdeveloped seeds.
- Over time, stored seeds lose viability, and their germination rates decline. While older seeds may still sprout, they often produce weaker plants that are more susceptible to pests and disease.
- Different seeds have varying life expectancies—some deteriorate faster than others, even under optimal storage conditions.

Testing Seed Viability: Unsure if older seeds will still sprout? Use the damp paper towel method to check. Place a few seeds on a damp paper towel, fold it over, and seal it in a plastic bag or container. Keep it in a warm spot (65-75°F or 18-24°C) and check after a few days. If most seeds sprout, they’re still viable; if not, it’s time to replace them.
This table gives general guidelines for the life expectancy of seeds:
| Very sensitive (use right away or within a few months) | Short life expectancy (2-3 years) | Medium life expectancy (4-5 years) | Long life expectancy (over 5 years) |
|---|---|---|---|
| Chives | Carrot | Bean | Cole crops (broccoli, cabbage, etc) |
| Garlic | Celery (short to medium) | Corn Salad | Cucumber |
| Leek | Corn (short to medium) | Endive | Eggplant |
| Onion (very sensitive to short) | Florence fennel | Lettuce | Melon |
| Parsnip | Spinach, New Zealand Spinach (short to medium) | Pea | Orache |
| Turnip | Pepper (medium – long life) | Squash, Pumpkin | |
| Radish | Tomato | ||
| Swiss Chard, Beet (medium – long life) |
For more information about saving seeds, read this blog post or watch this video.
3. Find a seed storage & seed organization method that works for you
An effective seed storage and organization system should be simple, functional, and easy to maintain. If you garden year-round, you’ll need a system that allows quick and frequent access. If you only plant once a year, your needs will be different.
Choose a seed storage method that suits your habits and budget—overly complicated or expensive systems are harder to stick with. Be patient as you develop your seed organization routine. It doesn’t need to be perfect; consistency is what matters most.

My Seed Storage and Organization System
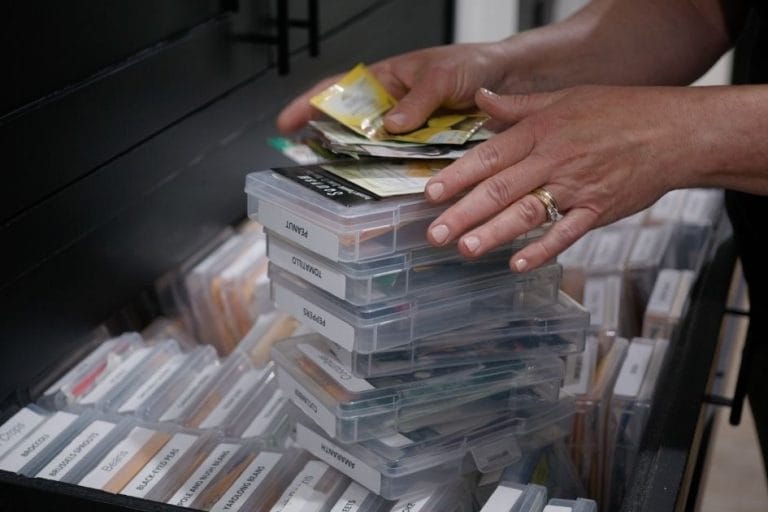
I use small, airtight containers for each type of seed to minimize air exposure. These are the containers I use on Amazon. These containers are stored in a large drawer, which keeps the seeds cool, dark, and easy to access when needed.

For added seed organization, the small containers can also be stored inside a larger storage box and placed in a cool, dark location.
To stay organized, I have a separate holding area for seeds I plan to plant soon and for packets that need to be returned to their containers. (This helps keep me organized if I can’t put seeds back right away.)

4. Label Seeds for Easy Identification and Planting
Clear labeling in your seed storage system saves time and makes knowing when to plant your seeds easier. Use labels to include any information that’s helpful for you. I use these white labels to mark the seed type on the top of each container for quick identification.

For added convenience, include planting dates and other key details. If you live in the low desert of Arizona, I offer pre-made labels in my shop with planting information for vegetables and flowers. You can see the vegetable labels here and the flower labels here.
Here’s the information I recommend when labeling your stored seeds:
- Seed name
- Planting dates
- Indoor seed-starting dates
Optional details for extra seed organization:
- Botanical name
- Germination time
- Preferred soil temperature
- Days to harvest
- Preferred sun exposure
Taking time to label your seeds now will make planting and garden planning much easier later.
Seed Box Labels with planting dates for vegetables and flowers


Purchase the Vegetable Labels here, and the Flower Labels here.
5. Create a System for Using and Rotating Your Stored Seeds Each Season
It’s easy to buy more seeds than you need, especially if you aren’t aware of what you already have. An effective seed organization system helps reduce unnecessary purchases and ensures you use your seeds efficiently. Get more budget gardening ideas in this guide.

Here are a few tips to incorporate into your system:
- Rotate your seeds: Place the oldest seeds in front and the newest in the back. This encourages you to use older seeds first to avoid waste.
- Designate a planting area: Keep a separate space for seeds you plan to use soon, making garden planning and planting quicker and easier. Learn more about how to plan your garden in this guide.
- Organize for convenience: Have a designated spot for seeds that need to be returned to their containers if you can’t put them back immediately. I will often keep my seeds out in this area until I plant them in case there is information on the seed packet I need to refer to.
- Categorize your seeds: Sort your seeds into groups that make sense for you—by type (e.g., vegetables, flowers, herbs) or planting season (e.g., cool-season and warm-season crops).
- Track inventory: Keep a notebook or digital list nearby to jot down seeds you’re running low on or those you’d like to order.


If anyone is still looking for these plastic storage containers Michael’s has them back in stock and online on sale for $16.99. I just bought two this morning for free pickup at the store. Hope this helps.
Can you still plant seeds past the expiration date on the packet?
Usually yes, you can. Do a viability test if you’re worried about poor germination.
Great informaton! Thank you