
Tips for Spring Planting – Spring Garden Checklist
With this spring garden checklist and five tips for spring planting, you are ready to give your garden the tune-up it needs to flourish. What you do at the beginning of the season will help ensure a happy, healthy, and productive garden all year long.

Key Takeaways: Tips for Spring Planting
- Start your garden season with the ‘Tips for Spring Planting’ checklist to ensure a healthy garden.
- Clean and prepare your garden by removing debris, repairing beds, and sanitizing tools.
- Make a detailed plan for your garden goals, including what to plant and where to sow seeds.
- Let seedlings acclimate to their new environment before planting to minimize transplant shock.
- Plant at the right time based on soil temperature after the last frost, focusing on warm-season crops.
Article Index:

Clean Up and Prepare the Garden for Planting

Cleaning the garden is a two-step process:
First, clear your garden area of anything that is not purposeful or beautiful.
“All you need to do is take the time to sit down and examine each item you own, decide whether you want to keep or discard it, and then choose where to put what you keep.”
— Marie Kondō, The Life-Changing Magic of Tidying Up: The Japanese Art of Decluttering and Organizing.

Second, once you have only what you need and love in your garden, take the time to “tidy up” the area.
- Harvest cool season crops to make room for spring planting.
- Remove leaves and debris, and pull weeds.
- Add fallen leaves and spent plants to compost. Learn how to compost in this blog post.
- Clean and sanitize growing containers and tools. Keeping things clean helps prevent pests and diseases that can undo your hard work.
- Repair garden beds and trellises.
- Clean and sharpen pruners & garden tools.
- Replenish mulch in pathways.
- Thin wildflower seedlings if they are growing in clumps. Allow each plant several inches of growing room (depending on the plant size). Overcrowded wildflowers will still grow, but plants with better airflow and adequate spacing grow and bloom better.

Make a Plan for Your Spring and Summer Garden

Now that your area is clean and you only have what you use in the garden, make a plan for what you want from your garden. This tip for spring planting is to begin with the end in mind. If this is your first garden, this blog post, “How to Start a Garden in 8 Simple Steps,” will help you get started.
Think about the goals for your garden.
- Do you want to grow a large amount of food? Or grow unusual varieties of vegetables not easily found at the store?
- Would you like a cutting garden for bouquets of flowers for your home and friends?
- Or a pollinator garden to attract bees and other beneficial insects and pollinators?
The first step to accomplishing your goals for your garden is to make a plan.
- Take a minute to recall what went well and what didn’t in the garden last season. If you have a garden journal to look back in, great! If not, now is the time to begin. Remember, “mistakes are proof you are trying!” Learn from those successes and mistakes as you make your new plan.
- Use a planting guide for your area to see what grows well now. This is the Vegetable Planting Guide I use for the low desert of Arizona.
- Sketch into a garden journal or type out how you will use the space you have to accomplish the goals you have set for your garden.
- Organize your existing seeds and saved seeds so you know what you have.
- Order seeds (I like ordering from Renee’s Garden Seeds, Baker Creek Seeds, and Botanical Interests) and locate sources for plants you would like to include.
- Begin starting seeds indoors for the upcoming season.
- Get a head start, sweet potato slips indoors, and pre-sprout ginger and turmeric if you are planting them this season. If you’re growing potatoes, begin chitting them. Learn how to grow potatoes in containers.
- Learn how to plan your garden.


Perpetual Vegetable, Fruit & Herb Calendar shows you when to plant vegetables in the low desert of Arizona and whether to plant seeds or transplants. See the planting calendar in my shop.
Get Your Garden Ready

- Add fresh compost to your garden beds. The organic matter in soil decomposes over time and needs to be replenished.
- It’s important to have your soil tested. This is the soil test kit I use. It’s simple. I get the results back within a few days and know (not guess) what my soil needs.
- Check your watering system and make adjustments, replace timer batteries (I use this one from Amazon), and fix broken or leaky fittings.
- Are you planting peas, luffa, or other vining vegetables in a different location? Add a trellis to that area.
- If your plan includes an additional raised bed or containers, purchase or construct them and prepare them for use.
- Prune existing roses. Give them a hard prune – clean up all dead wood crossing branches, touching canes, and non-producing canes.
- Plant roses. Early planting gives them time to establish before the summer heat arrives. I get mine from Heirloom Roses—take a look at my favorites and use this discount code GARDENAZ26 for a 20% discount.
- Prune grapes. The best time to prune grapes is when they are dormant. Learn how to grow grapes.
- Cut back garlic chives and chives. Cut back to soil level, divide (if desired), and top with a fresh layer of compost or manure.

- Plant bare-root fruit trees. They will get established quickly as temperatures warm.
- Prune deciduous fruit trees. Prune dead, dying, damaged, and dysfunctional branches.
Taking the time at the beginning of each season to prepare your soil for planting will improve your soil and harvests!
Let Seedlings Acclimate Before Planting
Whether you grow your own or get them from a nursery, it’s best to let seedlings gradually adjust to the environment in your garden. Leave them outside under a covered patio for the first day or two if cold nights are still an issue, plant in the morning to give the transplant a day in the sun to settle in before it cools off.
Consider covering new plantings for the first few nights if temperatures are below what they like and protect new seedlings from birds and other animals.
Handle transplants by roots and leaves when planting, not stems. They can’t grow a new stem; treat it with care. Once transplants go in the ground, I label each one before I lose track of what’s planted where. I go through my whole labeling method if you want to set up the same system.

Once you are ready to plant, enjoy the process of planting your seeds and seedlings. This is the fun part!


Plant At the Correct Time
Use the date on the calendar as a guide for planting, but the temperature is the best indicator of when to plant. Most vegetables germinate and grow best above a certain temperature; use a soil thermometer (I like this one from Amazon) and take the guesswork out of seeds germinating. Remember that soil in raised beds will heat up more quickly than in-ground beds.
For example, tomatoes and corn both prefer a soil temperature of approximately 60°F (16°C). Peppers do best in a slightly warmer environment, thriving at around 65°F (18°C). Meanwhile, squash requires a warmer soil temperature still, favoring conditions at around 70°F (21°C).

After your last frost date:
- Begin planting warm-season crops.
- Evaluate your existing tomato, pepper, and eggplant plants.
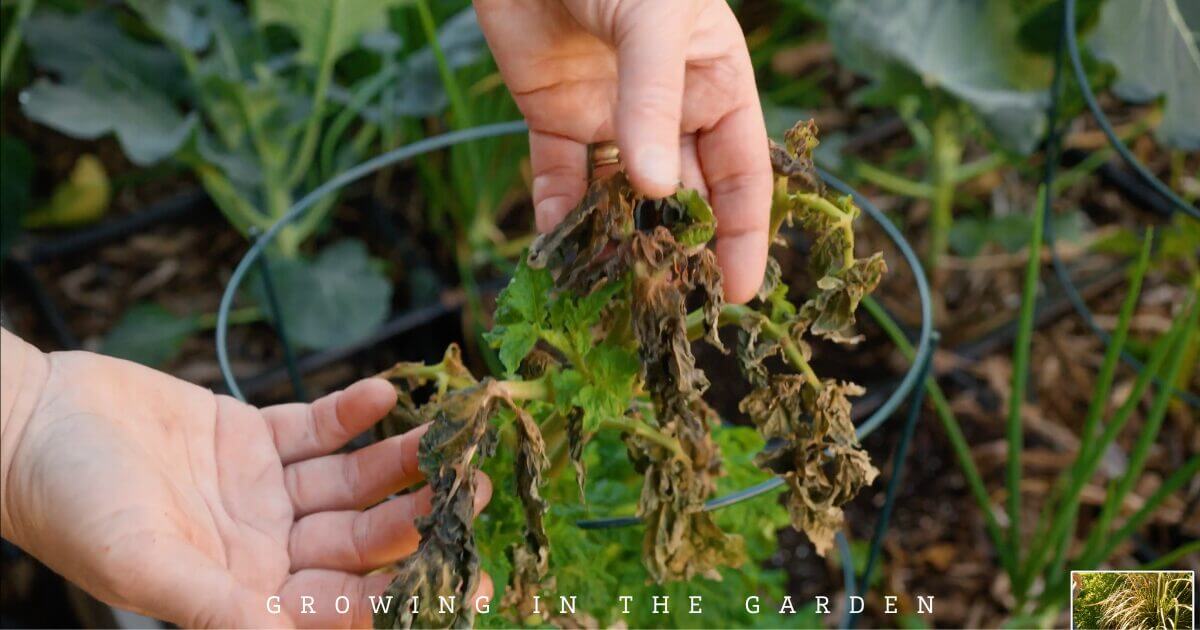
- Prune back frost-damaged plants. Don’t be in a hurry to prune off the damage; wait until spring has arrived – you’ll see new growth, and then you can tell what’s really dead. Make cuts just behind the dead parts – this will encourage side shoots where you want them to fill in. Read the complete guide on how to prune peppers, tomatoes, and eggplants after winter.
Ready to learn more about spring gardening? I cover this and much more inside Growing in the Garden Academy, where I teach monthly gardening classes and share real-time updates from my Arizona garden. Join us on Patreon to start learning today, and don’t miss this class: Spring Sprint: Maximizing Warm-Season Harvests in the Low Desert.



Leave a comment on Tips for Spring Planting – Spring Garden Checklist